It's hip to be auto-square...
- Oct 1, 2021
- 4 min read
Updated: Sep 20, 2024
A little known feature of grblHAL is the ability to automatically square a moving gantry machine. This allows you to have very precise control over the squareness of your gantry. All you need is an extra limit switch/sensor for your moving gantry and a way to precisely control the trigger points of your gantry limit switches/sensors.
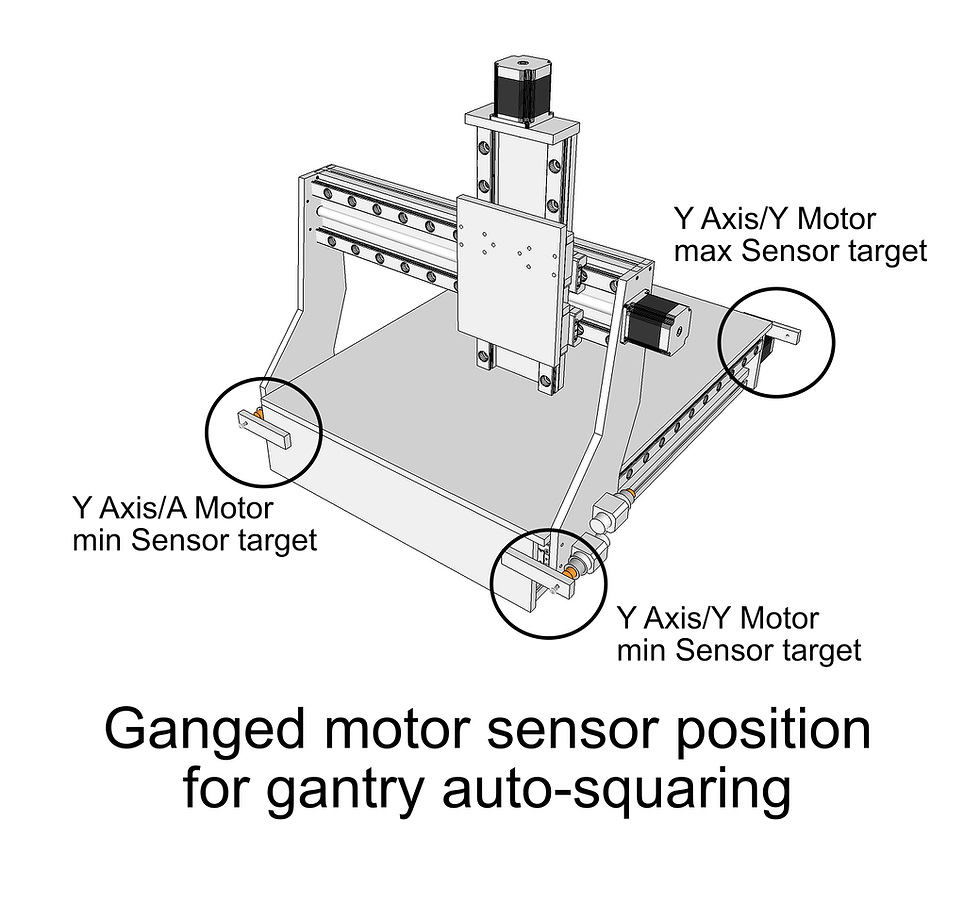
First, let's take a look at the example hardware. This is a typical moving gantry design where the gantry moves along the Y Axis. There are two sets of screws and stepper motors, one on each side of the gantry. The two Y Axis motors are ganged together and will move in tandem. Generally they stay in sync but an end-stop crash or missed steps can cause them to get out of sync. Then the machine would no longer cut squares or circles but rather parallelograms and ellipses. Without auto-squaring, you would have to manually adjust one side of the gantry to fix the problem. While auto-squaring may sound complicated, once it is set up, all you have to do is Home the machine.
Auto-squaring relies on having a minimum travel limit switch on each side of the gantry. Typically, they will be at the front of the CNC machine. In addition, you will need a way to adjust the point where each limit switch triggers. A common way is to have the limit target be mounted on a screw that you can turn to adjust the position of the target. You can see an example of this in the photo of the Avid Pro4848 limit target. The limit switches are wired so that the side with min and max travel limit switches goes to Axis Y limit input. The other side just has a single min travel limit switch that goes to the Axis A limit input. With auto-squaring enabled, grblHAL knows to make sure both minimum travel limit switches are triggered when homing the Y Axis. If the limit targets are properly adjusted, the gantry will be perfectly square.

Turning on auto-squaring is easy. You just enable it in the my_machine.h file and rebuild grblHAL. [2023 Edit: no need to set up a build environment and recompile any more, use the grblHAL Web Builder] You also have to enable a ganged axis and the auto-squaring option for that axis as well. There may be pre-built firmware available for your configuration. In grblHAL settings, be sure to enable homing ($22=1).
The next step is to test your machine and adjust the ganged axis limit switch targets if needed. With the auto-squaring firmware loaded, run a homing cycle - either from your GCode sender or by sending a $H command directly to grblHAL. You will need to create a GCode file to cut 4 holes in a rectangular pattern. The larger you can make the rectangle, the more accurately you can square the gantry. As a starting point before running the test, try adjusting the limit targets so they are both the same distance from the front of the machine and are in the middle of their adjustment range. Once you have run the test GCode, measure the distance between the diagonal holes. If the distances are equal then you are done and every time you home your machine, your gantry will be square. If the distances are not equal, adjust one of the limit targets a small amount and rerun the test. See the diagram below to know which side to adjust.. Be sure to mark the previous holes so you don't get confused. Repeat this process until your diagonals are equal.

And, now, when you start up your machine and run a homing cycle, you will have a perfectly square gantry every time.
[2024 UPDATE} In the current version of grblHAL, you don't need adjustable limit switch triggers (though they are still good to have). The $17x setting allows you to specify which axis sensor to pull off of: positive is the main (or Y1) sensor, negative is the second (or Y2) sensor. The simplest way to do this is mark a line perpendicular to one set of Y Axis holes (or use a large framing square) across to the other set and measure how far the the second set is from the vertical (right angle). A framing square is a good choice for measuring but any accurate way of measuring squareness is OK. If the A motor set of holes are closer to the zero of the machine bed, the offset is negative. It is positive if otherwise. Enter that value into $17x ($171 if ganging Y), rerun the test and verify the offset is zero. Also, you only need to drill 3 holes if you use this method.

While you are doing this, you may also want to tune your machine's homing performance. Grbl settings $24, $25 and $27 are worth looking at because the default values are fairly conservative. The way homing works is a rapid move is made to find approximately where the limit sensor is, Then it backs away from the sensor. Finally, it does a slow move to accurately find the sensor again. $25 (Homing search seek rate) controls how fast grblHAL goes when it is first looking for the limit. I am using 500 mm/min on my Avid machine - that allows homing to happen fairly quickly. The higher the speed, the more it will "run past" the trigger point. $27 controls how far grblHAL backs away from the limit switch after it first finds it. I have mine set for 1 mm. This was determined by seeing when the limit sensor switched off as I manually moved away from it. But, if you have a fairly fast seek rate, you may need to set $27 higher. Finally $24 controls the slow seek. I am using 25 mm/min. This seems to be a reasonably good value. After making those changes, homing is fairly fast on my machine.
About Me
I'm a CNC enthusiast. I run a small company, Brookwood Design, that makes 32-bit Grbl breakout boards for grblHAL and love to help people get the most out of their CNC machines.


Hey Phil,
Thanks for the jet lagged update! I thought I'd chime in with a way to get your machine square without having to cut anything.
I put a large piece of cardboard on the CNC table. Jog the spindle, with a sharp bit installed, to the far back left corner of your machine. I like to set work coordinate XY to zero for easy return to this spot. Drop Z down close to the cardboard and use a fine point pen to mark the exact spot under the bit's tip. Alternatively, you can just drop the tip of the bit down into the cardboard a little bit and turn the spindle by hand to make a tiny hole in…
Hi Phil,
I'm really enjoying the breakout board and grblHAL for my 3 axis machine. I have come unstuck with the autosquare routine though. My machine works just fine with a 3XGY firmware. But recently I wanted to take advantage of the autosquare feature and added another endstop on my second Y axis (wired on 'A'), and changed to a 3XGYAS firmware. The endstop works and the red Y 'light' shows up in iosender when either endstop is triggered. The machine still works fine, apart from the homing routine. It seems to seek out both endstops, but then makes a very rapid move and I get a fault on my motor driver and a 'hard limit' alarm in iosender. It…
Hi Phil
Please ignore my last post. I just re read your description and the answer was there all along. Thanks anyway.
Peter
Hi Phil
I purchased one of your breakout boards some months ago and I am now only getting to setting it up on my CNC. Since the time I bought the BOB and now I notice that there are some preconfigured builds with auto squaring and have just found this page talking about auto squaring.
I have a dual Y axis (Y and A) CNC Router and originally was going to put limits at both ends and put the NC limits in series wired back to the respective Y and A limit inputs. I now see you talk about separate max and min limits on Y and min limit on A. You also show these as separate connectors on you…
Hi Phil, I'm looking at squaring and I've found the options you to enable Y_GANGED and Y_AUTOSQUARE. Is there an option to define which output is ganged with Y?
Also, while looking at the configuration, I came across the SPINDLE_HUANYANG plugin, is this something I can use out of the box with your board? Thanks