Ethernet without Routers for grblHAL
- Sep 27, 2023
- 5 min read
Updated: Nov 16, 2023

Using Ethernet to control a CNC machine was once the province of high end professional CNC controllers. But now grblHAL supports Ethernet connectivity. Also, it is generally considered a good practice to use a direct (i.e. static) Ethernet connection to avoid network traffic. (Though, modern Ethernet switches make that unnecessary.)
With a managed network (ie, Router and Network switch), it easy fairly easy to get up and running with Ethernet. You use DHCP for automatic IP assignment and it just works. But what if you don't have an Ethernet network to plug into? This blog entry will show you how to set up and connect a Microsoft Windows PC directly to an Ethernet grblHAL board like the T41U5XBB or PicoCNC.
The process does involve diving into networking configuration. That can seem daunting but it is actual pretty simple. The general steps you will undertake:
Build firmware that has Ethernet enabled, via the grblHAL Web Builder. Then load it onto the grblHAL board.
Configure your grblHAL board to have a static IP address.
Configure your PC to support a static IP address.
Connect your GCode Sender to grblHAL.
We will be using ioSender for this so please download and install it. Make sure you have an Ethernet cable and power to your grblHAL board.
A note on IP addresses. Ethernet uses IP addresses to know which machine it should send data to. Every member of a network must have a unique IP address so we need to pick addresses that do not conflict with other networks. We have chosen to use 192.168.5.1 and 192.168.5.2 as our addresses. This is for a fairly uncommon "Class C subnet" but in the unlikely event of a conflict try changing to something different, Maybe 192.168.101.1 and 192.168.101.2. There is nothing special about the numbers, they just need to be different from any others in the network. Feel free to contact me if you are in this situation.
A note on Ethernet Cables: You do not need a special Ethernet Cable (no cross-over cable required). Any Ethernet Cable will work.
Building grblHAL with Ethernet Support
If you have already built and installed Ethernet supporting firmware, skip to the next section.
A note to Chrome users. The Web builder will not display well on Chrome but it works ok.
We start by opening the grblHAL Web Builder site.

Select Driver and the Board you have. If you have a T41U5XBB, select iMXRT 1062 (Teensy) for the Driver and T41U5XBB as the Board. If you have a PicoCNC, select RP2040 as the Driver and PicoCNC as the Board. In the General tab, select the options for your machine (Number of Axes, Ganged Motors/Auto-squared), Spindle options and so on.
On the Network/WebUI tab, select Ethernet in the Networking pull down box. If you have a PicoCNC, select WIZ550io (picoCNC actually supports the WIZ850IO which is a smaller board but has the same chip). Also check Telnet server, Websocket server and FTP server options.
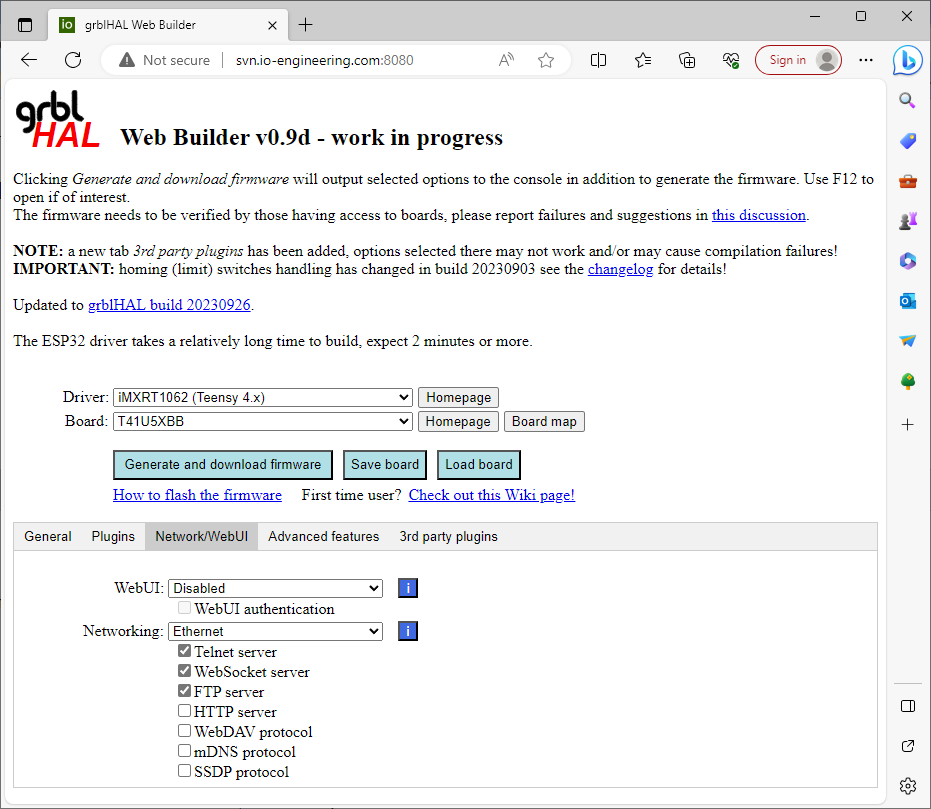
Select other options that your machine may need and click on Generate and download firmware. Save the resulting file. Refer to the User manual for your board on how to load the firmware. It is a good idea to use Save board to save your configuration before continuing. If you need to make a few changes, it is convenient to just reload your previously saved configuration via Load board..
Configure grblHAL for a Static IP Address
Connect the USB cable between the grblHAL board and your PC, open ioSender and connect to the grblHAL board. Go into the Settings: Grbl tab and open the Networking section.
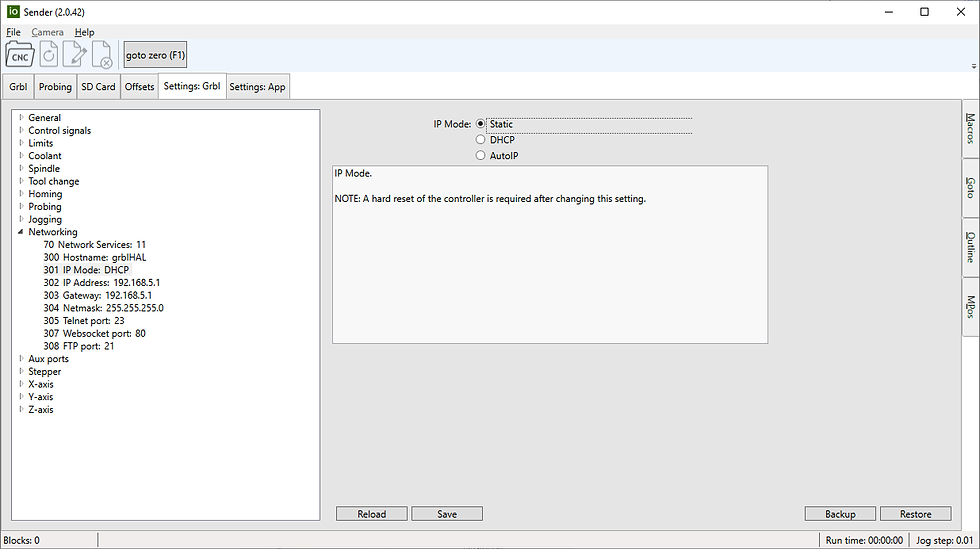
Click on 301 IP Mode and select Static. Verify that 302 IP Address is 192.168.5.1, 303 Gateway is 192.168.5.1 and 304 Netmask is 255.255.255.0.
Click on the save button and exit ioSender. To do a hard reset, power cycle your grblHAL board. On the PicoCNC you can press the Pico Reset button for a hard reset. Restart ioSender, click on the Console tab and look for [IP:192.168.5.1]. That verifies your changes are in.

A note for using other GCode Senders, you can set the configuration options by using console input. To set IP Mode to static, send $301=0. Send $302=192.168.5.1, $303=192.168.5.1 and $304=255.255.255.0 to configure the IP address, Gateway and Netmask. You can verify the settings by typing $$ to list all of them.
Configure your PC for static IP Address
We will now configure your network connection on the PC for a static IP address. Windows 7 and 10 are very similar. Windows 11 is completely different, though. For Windows 11, skip to the next section.
For Windows 7 and 10, you open Settings (via Windows Key). In Windows 7, it is called Control Panel.

Then double click on Network and Internet

Double click on Change adapter options.


Select the Ethernet Interface to which you want to connect your grblHAL breakout board.
Note that if there are multiple network interfaces, you will need to determine which one you want to connect. Unused adapters will have a red X on them. If you connect your breakout board to the correct network port on the PC, You should see an LED flickering on the grblHAL Network socket (AKA RJ45).
Right click on the one you choose. Select properties.

Click on Internet Protocol Version 4 (TCP/IPv4) to highlight it and then click on the properties button.
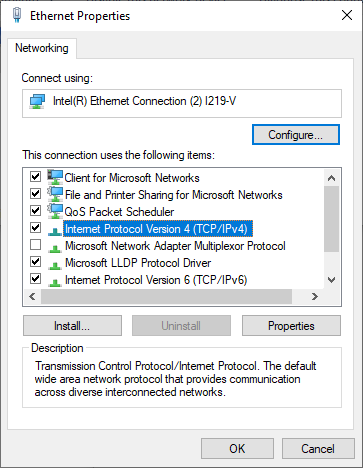
Select Use the following IP address. Enter 192.168.5.2 in the IP address field and 255.255.255.0 in the Subnet mask field. Do not fill in any other fields. Click on OK.

Click OK on the previous form. We are now ready to test. Make sure the Ethernet cable is connected to both the grblHAL board and your PC.
Make sure your grblHAL board is properly powered. You should see an LED flickering on the grblHAL Network socket (AKA RJ45). Open a command window (Windows Key, cmd.exe) and type ping 192.168.5.1.
If you get a response as shown in the screen shot, you are ready to move on to the next step. Otherwise, go back over the above instructions.

Proceed to the Connect ioSender section.
For Windows 11, Press the Windows key and Open Settings.

Select Ethernet

Click on Edit IP assignment.

Click on Automatic (DHCP) and then click on Manual.

Now, click on the IPv4 slider to change it to On.

When the Edit IP settings dialog comes up fill out the IP Address and Subnet mask fields as shown. Do not fill out any other fields. When you are sure everything is correct, click on Save.
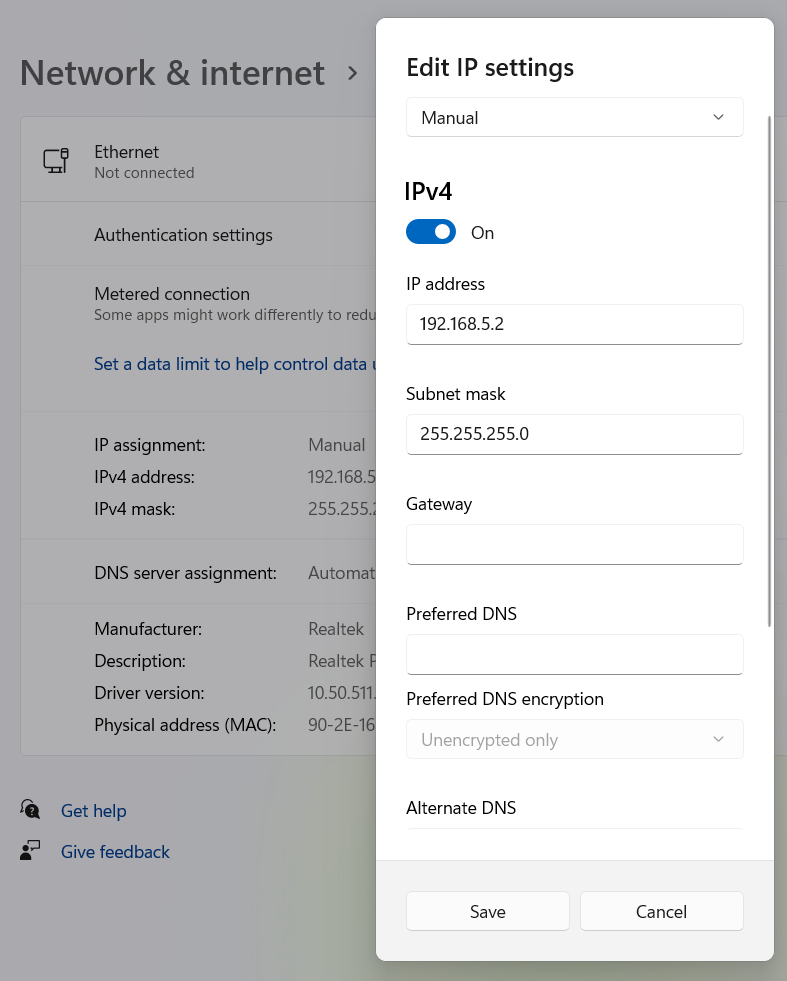
You should see the following window showing IP Assignment as Manual and the IP address and Subnet you entered.

Open command window (Windows Key, cmd) and type ping 192.168.5.1. If you get a response as shown in the screen shot, you are ready to move on to the next step. Otherwise, go back over the above instructions.
You have completed this step and can now move on to the next one.
Connect ioSender to your grblHAL board
If you have ioSender open, close it now. Basically, we will force ioSender to ask which kind of connection you want to use. If you use a T41U5XBB, disconnect the USB cable to remove power. If you use a PicoCNC, you can press and hold the Reset PicoCNC button. Start ioSender and it will present the Sender Connection dialog.
Once the Sender connection dialog box has opened, Plug the cable into your grblHAL board or, if using a PicoCNC, release the Pico Reset button.

Now, click on the Network tab. You should see this.

Verify that the IP address is set to 192.168.5.1 and Port 23. Correct if not and then click Ok.
At this point ioSender should come up. Click on the Console tab towards the bottom of the ioSender window. You should now be able to see the bootup information from grblHAL. Look for a line that reads [NETCON: Telnet].

This indicates that you are connected via Ethernet and you are ready to start using your machine!
About Me.

I'm Phil Barrett, a long time CNC enthusiast. I run a small company, Brookwood Design, that makes several breakout boards for grblHAL and love to help people get the most out of their CNC machines.


Hello, I'm trying to run GrblHal over Ethernet on the w5100s-evb-pico board according to your instructions, but I can't ping it, it says "Reply from 192.168.5.2: Destination host unreachable". I'm building a project from the sources on GitHub grblHAL
/RP2040. I use the pinout file picobob_dlx_map.h, I swapped only the SPI_IRQ_PIN pins with SPI_RST_PIN, with how they are located on the w5100s-evb-pico board. I connect the module directly to the computer, tried several different Ethernet cables, straight and crossovers.
Can you give me any advice or a hint on what to do?
Did I miss something? Usually a crossover cable is needed to connect a computer directly to another computer.